


I still remember my first attempt at airbrush makeup—it was a delightful mess! Just like the day I tried to bake a cake without following the recipe. After hours of experimenting and a few colorful mishaps, I can finally say I’ve cracked the code for a lovely daytime look, thanks to Dinair airbrush products. In this post, I'll share everything I've learned on this journey, from must-have tools to step-by-step application techniques, making it easier for you to master your makeup game.
Why Airbrush Makeup?
Have you ever wondered why airbrush makeup is becoming the go-to choice for many? I mean, who doesn't want that flawless finish? Let's dive into the world of airbrush makeup and explore its many advantages over traditional makeup.
The Advantages of Airbrush vs. Traditional Makeup
First off, airbrush makeup offers some serious benefits. Here are a few key points to consider:
Even Application: Airbrush makeup provides a smooth, even layer. It’s like painting a canvas. You get a consistent finish without the streaks that can come from brushes or sponges.
Great Coverage: It’s fantastic for covering blemishes and imperfections. Whether it’s a pimple or uneven skin tone, airbrush makeup can help you achieve that perfect look.
Long-lasting Effects: One of the best things about airbrush makeup is its durability. It can last over 12 hours! This makes it perfect for long days, whether you're at work, a wedding, or a night out.
Lightweight Feel: Unlike traditional makeup, which can feel heavy, airbrush makeup is about 30% lighter. You might even forget you’re wearing it!
Long-lasting Effects: Perfect for Long Days
Imagine getting ready in the morning and not having to worry about touch-ups throughout the day. Sounds great, right? With airbrush makeup, that’s a reality. It’s designed to withstand heat, humidity, and even tears. Whether you’re dancing at a wedding or sweating during a summer outing, your makeup stays put.
Jessica Hart once said,
"Airbrush makeup gives you that effortlessly flawless look that traditional methods sometimes can't deliver."
This is so true! The longevity of airbrush makeup means you can focus on enjoying your day instead of worrying about your appearance.
Lightweight Feel for a Natural Look
Another fantastic aspect of airbrush makeup is its lightweight feel. Traditional makeup can sometimes feel like a mask. You apply layer after layer, and before you know it, your face feels heavy and cakey. But with airbrush, it’s different. The fine mist of makeup feels almost like a second skin.
Have you ever tried to wear a heavy foundation on a hot day? It’s uncomfortable, right? Airbrush makeup allows your skin to breathe while still providing the coverage you desire. It’s perfect for those who want a natural look without sacrificing quality.
Making the Investment
Now, you might be thinking, “Isn’t airbrush makeup more expensive?” Well, it can be, especially if you’re investing in good equipment. But as Sara Tech points out,
"Investing in good airbrush equipment can revolutionize your makeup routine."
This investment pays off in the long run. You’ll save money on products and time on application. Plus, the results are often worth it!
Conclusion
In conclusion, airbrush makeup is a game-changer. It offers an even application, great coverage, long-lasting effects, and a lightweight feel. It’s suitable for various skin types and perfect for both professional and casual use. If you haven't tried it yet, I highly recommend giving it a shot!
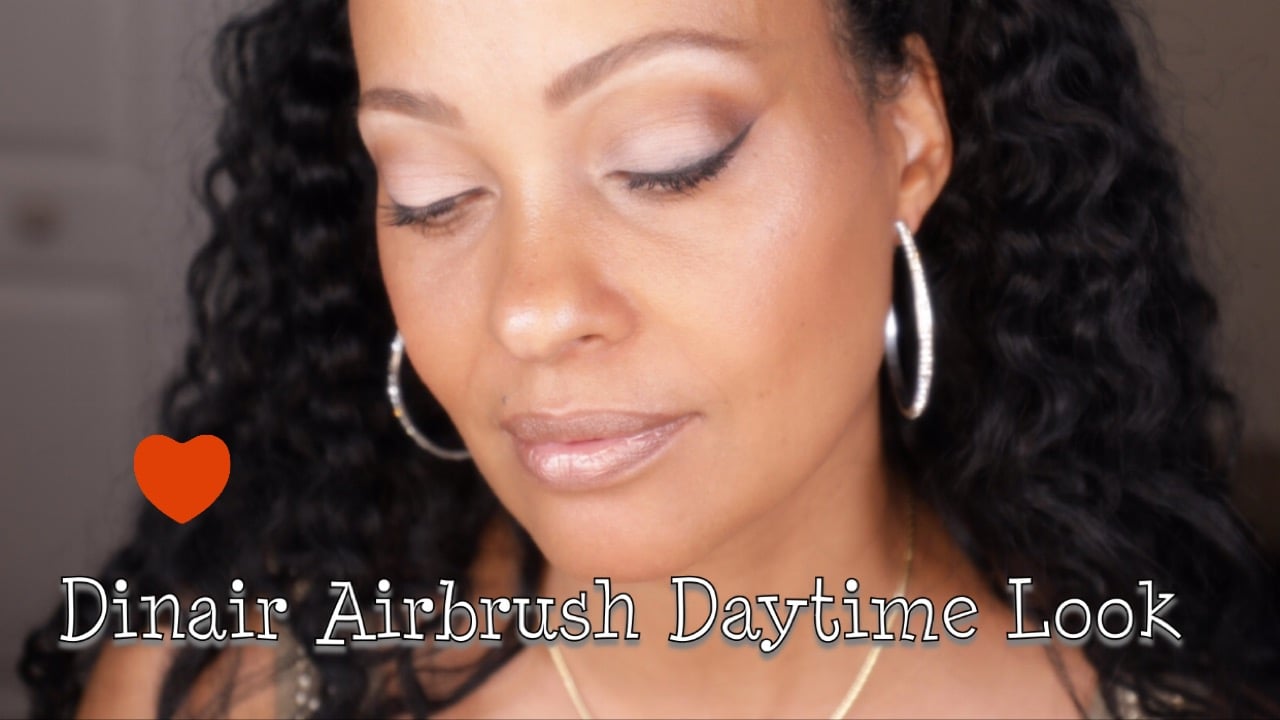
Step-by-Step Guide to Achieving an Easy Daytime Look
Let’s dive into creating that effortless daytime look! It’s all about simplicity, radiance, and a touch of elegance. I’m excited to share my step-by-step guide with you. Trust me, it’s easier than you think!
1. Gathering the Right Tools and Products
First things first, we need to gather our tools. Having the right products can make a world of difference. Here’s what you’ll need:
Smashbox Primer: This is a must-have for a smooth base. It preps your skin beautifully.
Airbrush Makeup Kit: Choose one with a variety of shades. Did you know there are over 100 airbrush shades available?
Setting Spray: To lock in your look for the day.
Brushes and Sponges: For blending and finishing touches.
Having these tools on hand will set you up for success. It’s like having the right ingredients for a delicious recipe. Without them, you might end up with a less-than-stellar result.
2. Application Techniques Breakdown
Now that we have our tools, let’s break down the application process. Here’s how to go from primer to those finishing touches:
Start with Primer: Apply a small amount of Smashbox primer to your face. This creates a smooth canvas for your makeup.
Foundation: Using your airbrush kit, apply your foundation evenly. Remember, less is more! A light layer can give you that natural glow.
Concealer: Use the airbrush concealer to cover any blemishes or dark circles. Blend it well for a seamless look.
Blush and Highlighter: Add a touch of blush to your cheeks and a bit of highlighter on the high points of your face. This adds dimension.
Eyes: Keep it simple! A light wash of color on the eyelids and a coat of mascara will do the trick.
Lips: Choose a nude or soft pink lip color for a fresh look.
Setting Spray: Finish with a setting spray to ensure your makeup lasts all day.
Each step is crucial. Think of it like building a house. You need a solid foundation before you can add the beautiful details.
3. Customizing Shades for Your Skin Tone
Choosing the right shades is key to achieving that flawless look. Not all colors suit every skin tone. Here’s how to customize your shades:
Know Your Undertone: Are you warm, cool, or neutral? This will guide your color choices.
Test Before You Apply: Always test the shades on your jawline. This helps you see how they blend with your skin.
Mix Shades: Don’t be afraid to mix different shades to create the perfect match.
Finding the right shades can feel like searching for a needle in a haystack. But once you find them, it’s worth it! You’ll look radiant and feel confident.
Final Thoughts
Remember, “A flawless application is all about the technique and the right combination of products.” - Martha Stewart. With practice, you’ll master this easy daytime look in no time. The average application time is only 10-15 minutes, so you can easily fit this into your morning routine.
Now, go ahead and give it a try! You’ll be amazed at how simple it is to achieve a polished, natural look. Happy airbrushing!
Common Mistakes and How to Avoid Them
When it comes to airbrush makeup, many of us want that flawless look. But, let’s be honest. It’s not always easy to achieve. I’ve seen beginners struggle, and I’ve made my fair share of mistakes. In fact, did you know that about 70% of beginners face issues when using airbrush makeup? That's a staggering number! So, what are these common pitfalls, and how can we avoid them? Let’s dive in.
1. Overapplying Product
One of the biggest mistakes I see is overapplying product. It’s tempting to keep spraying to cover imperfections, but this can lead to a cakey look. Trust me, nobody wants that! Think of it like frosting a cake. Too much frosting can make it look unappetizing. Instead, aim for a light, even application. Start with a small amount and build up gradually. This way, you can control the coverage and keep your skin looking natural.
2. Not Prepping the Skin
Another common mistake is not prepping the skin adequately before airbrushing. Just like you wouldn’t paint a wall without priming it first, you shouldn’t apply airbrush makeup on unprepared skin. A good primer is essential. It helps create a smooth canvas, allowing the makeup to glide on effortlessly. I always use a primer before I start. It makes a world of difference!
Here’s a tip: Make sure to cleanse and moisturize your skin before applying any makeup. This helps to hydrate your skin and ensures that the makeup adheres properly. If your skin is dry or flaky, the makeup will cling to those areas, making it look uneven.
3. Using Mismatched Shades
Have you ever looked in the mirror and thought, “Why does my foundation look so off?” This often happens when we use mismatched shades. It’s crucial to find the right shade that complements your skin tone. I can’t stress this enough: always test shades before committing to the full face. Swatch a few options on your jawline and see how they blend with your skin. Lighting can also play tricks on us, so check in natural light if possible.
Practical Solutions
Now that we’ve identified these common mistakes, let’s talk about some practical solutions:
Start Small: When applying airbrush makeup, begin with a light mist. You can always add more if needed.
Invest in a Good Primer: A quality primer can make all the difference in how your makeup looks and lasts.
Shade Testing: Don’t skip this step! Test multiple shades to find your perfect match.
As Michelle Visage wisely said,
“Mistakes are simply the price we pay for learning, especially in makeup!”
This couldn’t be more true. Every mistake is a chance to learn and improve. We all start somewhere, and it’s okay to make errors along the way.
Conclusion
In conclusion, airbrush makeup can be a fantastic tool for achieving a flawless look, but it’s essential to avoid common pitfalls. By being mindful of overapplication, properly prepping your skin, and choosing the right shades, you can enhance your makeup experience. Remember, practice makes perfect. Don't be afraid to experiment and learn from your mistakes. Each application is a step towards mastering the art of airbrush makeup. So, let’s embrace the journey and enjoy the process!
